Chalking a Pool for Measuring with the Trigonon
Why We Always Recommend Chalking a Pool
When measuring a liner with the Trigonon, we strongly recommend chalking the pool before you begin measuring.
The reason is simple: after the pool outline is completed, almost every additional measurement references those original outline points. If you cannot return to the EXACT same point you originally measured from, your measurements can become inconsistent and less accurate.
Taking the time to properly chalk the pool creates permanent reference points throughout the measuring process and helps ensure the highest accuracy possible.
Important Starting Guidelines
Start Near the AB Line When Possible
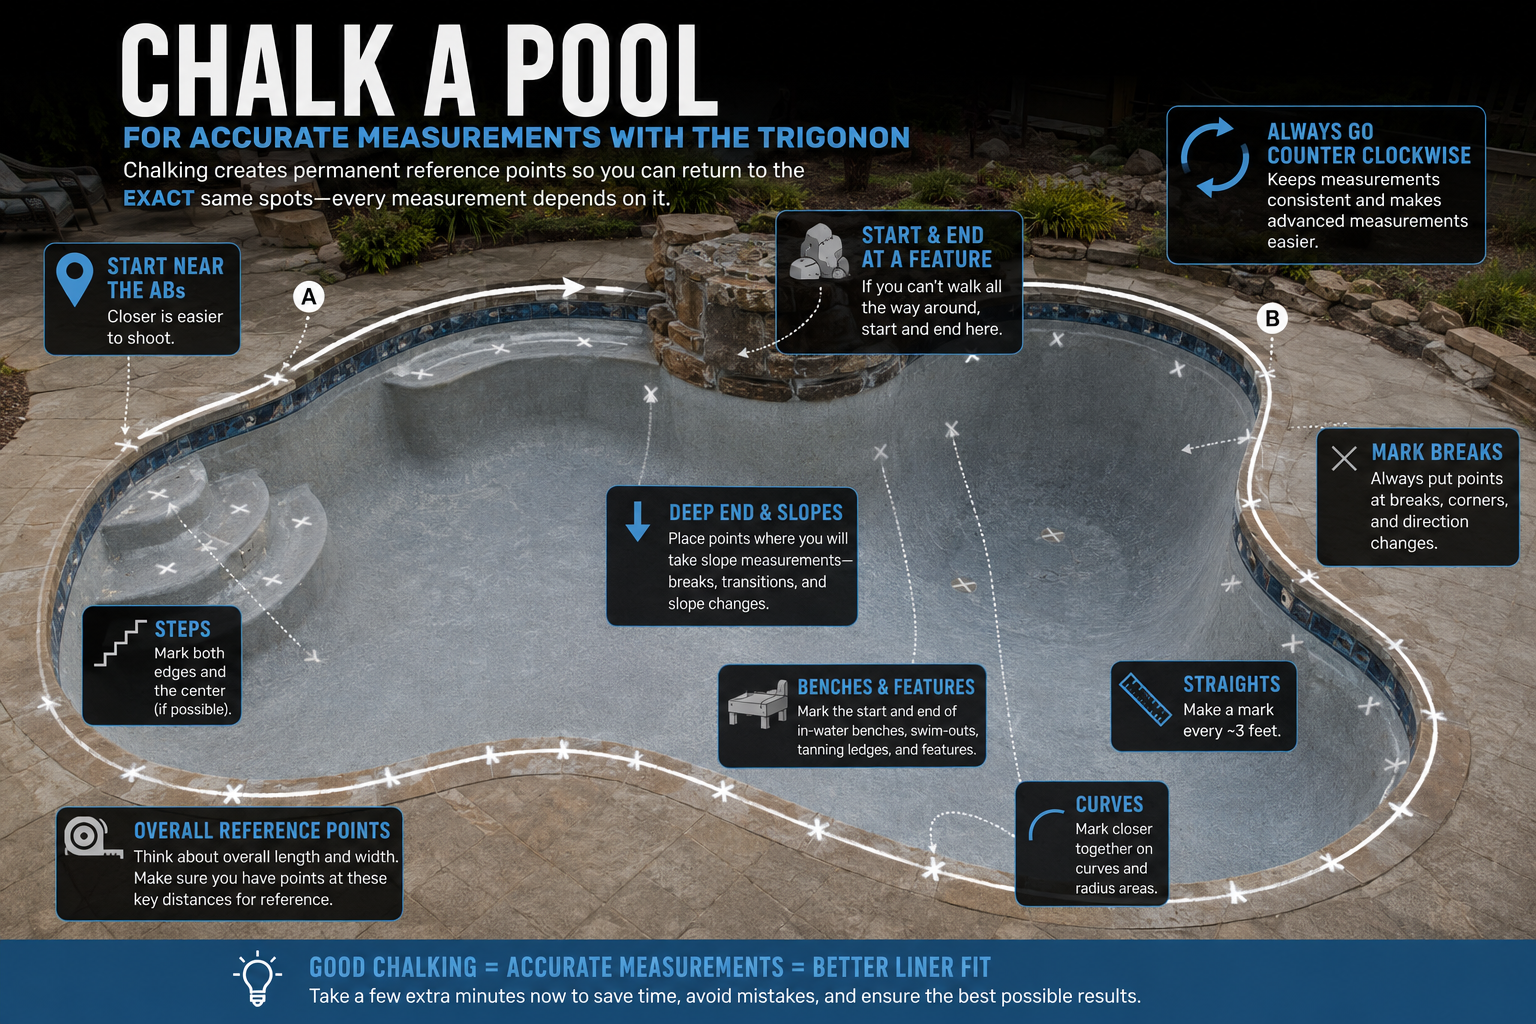
Whenever possible, begin your outline near the AB points.
Closer shots are easier and typically more accurate, especially during the beginning of the measuring process.
Start and End at Difficult Features
If the pool has a feature that prevents you from walking completely around the pool outline, plan your outline so that you START and END at that feature.
Examples may include:
- Waterfalls
- Raised walls
- Large rock features
- Attached spas
- Obstructions or limited deck access
This helps avoid difficult transitions later in the measurement.
Always Measure Counter Clockwise
Always move around the pool in a counter clockwise direction when creating the outline.
This is important because:
- It keeps measurements consistent
- It makes advanced measurements easier later
- It helps maintain proper point order inside the software
Consistency is critical.
Where to Place Chalk Points
Always Mark Breaks and Direction Changes
Any location where the pool changes direction should have a chalk point.
Examples include:
- Corners
- Radius transitions
- Step changes
- Bench starts and ends
- Slope transitions
These points define the true shape of the pool.
Spacing on Straight Sections
On straight walls, place chalk marks approximately every 3 feet.
Straight sections generally require fewer points because the shape does not change significantly between measurements.
Curved Sections Need More Points
On curves and radius sections, place points closer together.
The tighter the curve, the closer the points should be.
More points create a more accurate representation of the pool shape.
Steps, Benches, and Features
Steps
For steps, you should mark:
- Both outside edges
- Center points when possible
- Any radius or curved sections
The more clearly the step geometry is defined, the better the final liner fit will be.
In-Water Benches and Features
For benches, swim-outs, tanning ledges, and other in-water features, mark:
- The beginning of the feature
- The end of the feature
- Any corners or transitions
These features are often overlooked but are important for liner accuracy.
Deep End and Slope Areas
In the deep end, make sure to place points where slope measurements will be taken.
This is especially important around:
- Break lines
- Hopper transitions
- Deep end corners
- Slope change areas
These reference points help maintain proper floor geometry.
Overall Pool Reference Points
As you chalk the pool, think about the overall:
- Length
- Width
- Major dimensions
Make sure you have points located at these key reference distances.
These points can be extremely helpful later when:
- Verifying measurements
- Troubleshooting
- Performing advanced measurements
- Confirming overall pool geometry
Final Thoughts
Good chalking creates the foundation for an accurate liner measurement.
A few extra minutes spent properly marking the pool can:
- Improve accuracy
- Reduce missed details
- Simplify advanced measurements
- Help avoid costly liner issues later
When in doubt, add more reference points. It is always easier to ignore an extra point than it is to recreate a missing one later.