Trigonon Training2025-10-15T20:12:53+00:00

WELCOME TO TRIGONON TRAINING

How to measure a pool liner and a pool cover using modern technology for both accuracy and minimizing fatigue

Our Trigonon pool measuring device uses proven mathematical formulas and standardized processes to ensure swimming pools are measured accurately for replacement liners and covers.

It’s the only device that can effectively and accurately measure swimming pools, regardless of the pool layout.  In other words, our device can measure liners down to an 1/8″ accuracy, which is crucial for liner replacements.

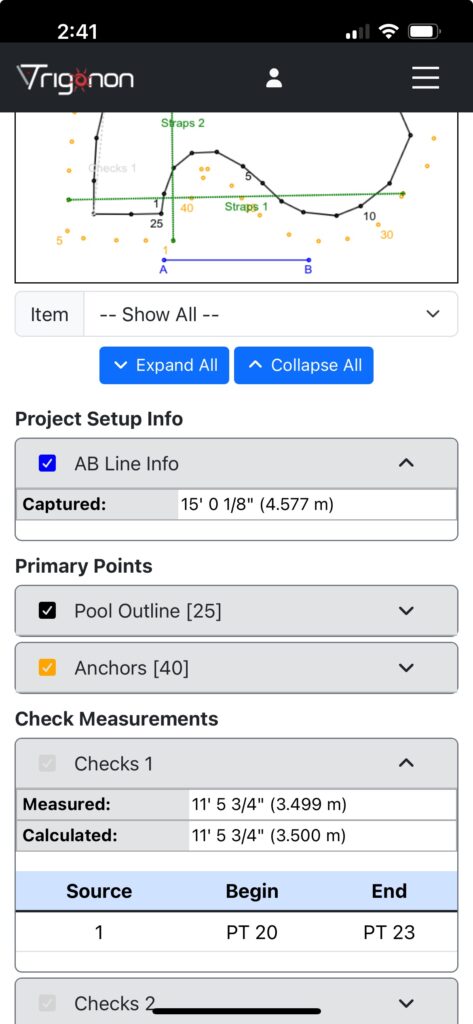
screenshot of cross check

In addition, it has the ability to measure any type of water feature.  There are other technologies that try to measure water features… and can sometimes measure the easier setups.  But, the Trigonon is the only one that can measure any water feature, regardless of the layout!  Underwater stairs have never been easier.  You get the exact measurements the manufacturers need… in the format they need.

The software in our device can allow you to set up the AB buckets in a different location to get to “hard to measure spots”, while continuing to convert the measurements back to the original AB bucket locations!  We can also allow you to measure an exact location of a feature in the middle of the pool (such as a Funbrella), without ever getting wet!

We can teach you how to measure walls without getting into the water where it was otherwise impossible.  Unlike drones, you don’t have to worry about having a license, trees being in the way, or how you are going to measure the inside of a Grotto.  Ours can do it all!

Trigonon device measuring the inside of a grotto in a swimming pool using modern technology

Let us train your employees how to measure a pool!

Many pool company owners tell us that they have many years experience pulling tape measures, so accuracy isn’t as much of a concern, when they do the measuring.  At the same time, they say they appreciate our device, so that they no longer have to bend over continually.

However, owners also tell us they really need help training their employees, on how to effectively measure a pool.  They don’t have the time to continually train and employee mistakes can be costly.  So, they get stuck having to do all measurements.

Well… we’ve take care of that for you!  Our software has been redesigned, so that it walks anyone through the measurement process, step by step.  In addition to a standardized process… we also have pictures, along with written instructions, to help and remind employees what to do at each step!

In addition to this, we also developed “help” icons that can be clicked on, to get more information.  We even have videos that offer training support!

image showing the Trigonon app screenshot that helps employees train on the device

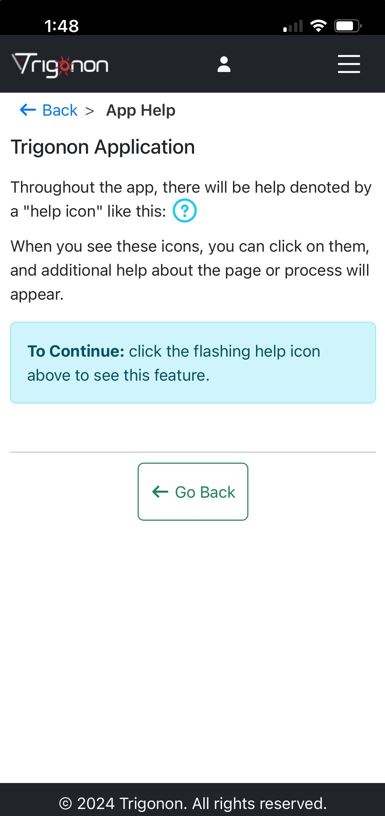
screenshot of help icon for employee training

Take a practice test before going to a pool measurement

To get the best results with the Trigonon, it’s important to spend a little time training on both the device and the software. Practicing at home or in the office before heading out into the field will make measuring swimming pool covers or liners much easier and more efficient.

We built a “Training University”, that helps you learn to do your first practice measurement!  It walks you through a whole “mini-process” and then makes sure you do the measurements correctly, so you can troubleshoot any errors before heading out for field tests!

screenshot showing the Trigonon training app that has a University tab where you can click and get trained on how to use the device and do practice sessions

We give you the ability to help your employees while they are onsite

One of the special features of our device, is that it allows you, the expert, to be able to “see” the project in real time, while your employee is out there measuring the pool!  Since it’s a web-based application, you have a company account… meaning the measurements your employee is taking is not stored on his phone.  Rather, the measurements are stored in your account within the company.  So, anyone you authorize, can see the information.

So, you can login, and see the pool drawing, the measurements taken, the photos of the pool, etc.  Then, before the employee leaves the job site, you can review it for troubleshooting.  If they forgot to do some steps, you can remind them or teach them what step needs to be done.  You can also use your experienced eye to see what areas may need extra photos, extra measurements, etc.

This is a huge benefit for companies.  It prevents having to drive back out to a job site, just to get a single measurement, or something simple that could have been noticed before they left during the first measurement.

You can also see all stored projects from the past, etc.  If your employee leaves your company the information does not go with them. You still have everything stored and kept safe!

image showing a pool outline that the owner can see from his office to help the employee measure a pool for a liner at the pool location

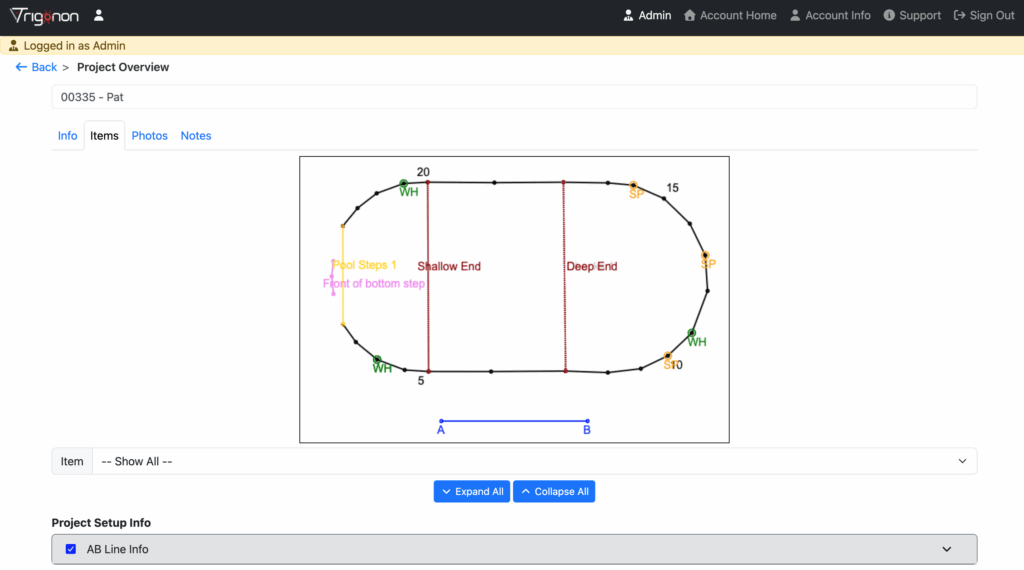
pool company owners can see projects in live time and help employees while at the job site

Visit Our  Channel For More Content

Lesson 1

Getting Started – Create Account2025-03-10T18:24:34+00:00

The first step to using the Trigonon is creating an account. No credit card is required to sign up, and you can start using our AB app with a tape measure for free. You’ll only be asked for payment information when you’re ready to purchase a unit.

How to Create Your Account

  1. Go to: measurewith.thetrigonon.com or click Sign Up from the homepage.
  2. On the sign-up screen, click Sign Up For New Account.
  3. Enter your company name and a U.S.-based mobile number (this helps us prevent spam).
  4. We’ll send you a text message with a verification code. Enter the code to verify your account.

That’s it — you’re all set! Your new account is now active, and you can start using the app immediately.


Getting Started – How To Order2025-03-10T19:01:21+00:00

Now that you have created an account you can order a Trigonon Unit.

  • Login and click on the Account tab.
  • Then press Device Orders.

Follow the prompts to order a new device.  Notice, you will need a valid credit card to purchase a unit.  You will also be required to fill out a valid email address and shipping address.

If units are in stock they will typically ship out within 3 business days.  If out of stock you will need to email support to get an accurate ship date. Units are shipped out via USPS and we can provide a tracking number upon request.

Assembly – Unit & Case2025-03-10T18:47:08+00:00

With your purchase of a Trigonon unit, you’ll receive a durable carrying case and a power cable. The case is specifically designed to protect your Trigonon when not in use.

To ensure longevity, avoid exposing the Trigonon to direct sunlight or high temperatures, such as leaving it on your car’s dashboard on a hot summer day. As a precision tool, it requires careful handling.

While the carrying case is waterproof, the Trigonon itself is not. Do not expose the unit to moisture, as damage caused by water is not covered under the warranty.

Assembly – Trekking Pole2025-04-21T14:00:19+00:00

Every Trigonon device comes with a Trekking Pole that is adjustable and allows you to move the Trigonon Device up and down the pole.

This is useful on areas where you have different levels involved.  An example would be measuring underwater stairs, for a liner replacement.  You would simply use the attachments on the Trekking Pole, to lift the unit higher every time you want to drop down to another stair in the water.  Then, you can easily measure the edge of each step.

We also provide an attachment that can be fitted to the end of the Trekking Pole that fits the corner of the stairs.  It allows the very edge of the stair to measured!

Assembly – Buckets & Donut Shades2025-04-21T14:01:44+00:00

You’ve now been informed about the proper care of the your Trigonon device and learned about the attachments that come with it.

Here are a couple more items you need before you start measuring pools on a continuous basis:

1. TWO White Buckets – These will be used for your AB points.  We have found white buckets are the best for attracting the targeting and measuring lasers.  Most pool companies have a few 5-gallon buckets that they can use for measuring.  However, if you need two clean, white buckets, you can order directly from Walmart and have them shipped to your nearest location, so you get free shipping

Here is a link:  White 5-gallon Bucket at Walmart

2. TWO Clamp-on Umbrellas – If you are working where direct sunlight is hitting the white buckets, we have found that shading the buckets allows the measuring laser to work better and faster.  By using an umbrella that clamps onto the white pails you purchased, it will allow the bucket to still be shaded in direct sunlight.  You can also purchase them at Walmart.

Link to Walmart:   Umbrella with Clamp for White Buckets at Walmart

Lesson 2

Config & Setup – Green Laser & Safety2025-03-10T19:27:56+00:00

One of the key features that sets the Trigonon Swimming Pool Measuring Device apart is our Patent Pending Green Targeting Laser. Unlike traditional measuring devices that use low-power red lasers, which are nearly impossible to see in bright sunlight, our high-power green laser is designed specifically for outdoor visibility, even in direct sunlight. This makes aiming and targeting much easier and more accurate.

However, due to the brightness and power of the green laser, there are some important safety precautions to follow:

  • Always wear the provided green safety glasses when operating the Trigonon. This helps protect your eyes and makes the laser easier to see.
  • Ensure anyone in the vicinity also wears eye protection if they may be exposed to the laser beam.
  • Only aim the laser at approved targets such as the AB targets, pool walls, or pool features. Never point the laser at people, animals, reflective surfaces, or aircraft. Pointing the laser toward the sky or unauthorized objects may violate Federal Laws.
  • Turn off the green laser when operating indoors. The high-power laser is not necessary for indoor use and may pose an unnecessary safety risk. Please refer to the Setup and Configuration section of the manual to learn how to disable the laser when working indoors.

The green laser is a powerful tool that significantly enhances the accuracy and efficiency of your measurements, but it must be used responsibly. Always prioritize safety when operating the Trigonon.

Product: 12mm Green Laser Module 532nm 50mW

Product Description:
This 12mm green laser module features a powerful 532nm 50mW green laser head, designed for high visibility and performance. Equipped, it operates at 3V.

Key Features:

  • High Performance: Utilizes advanced chip technology to enhance brightness and power efficiency while keeping costs reasonable.
  • Compact Design: Diameter of 12mm and overall length of 55mm (including spring), with a copper head measuring 30mm.
  • Stable Output: Produces a 532nm green light with a consistent 50mW output power.
  • Durable Construction: Built with high-quality materials for reliable performance.

Specifications:

  • Operating Voltage: 3V
  • Wavelength: 532nm (green light)
  • Output Power: 50mW
  • Dimensions:
    • Diameter: 12mm
    • Total Length: 55mm (including spring)
    • Copper Head Length: 30mm
  • Application: Trigonon Swimming Pool Liner & Cover Measuring.

This module offers an excellent balance of performance and affordability, making it perfect for outdoor measuring.

Config & Setup – Voice Prompts2025-03-10T19:50:55+00:00

The Trigonon uses voice prompts to help guide the user during the learning process.  These prompts can be turned on and off by the user.  To access these setting look for the Capture Control drop down on any measuring or setup screen.

  • Enable Targeting Laser – Turns the green targeting laser on and off during the measuring process.  Turn off for indoor measuring.
  • Use Screen Prompts – While on the application will pop up an OK message before taking any measurement to slow down the process.  This is good to leave on while you are learning.  When you get better at using the Trigonon, you can speed up the process of measuring by turning this off.
  • Use Voice Prompts – Another training feature that tells you what to do.  Turn off to speed up the process.
  • Speak Results – As it implies, this will speak the distance measured after the measurement is taken.
Config & Setup – Hover Timeout2025-03-10T19:55:21+00:00

The Hover Timeout (Sec) setting is also located on the Capture Controls screen.  The default is 20, we advise using between 10 – 20. This is the amount of time in seconds before a failed measurement will stop trying.  If the laser gets lost or you are taking bad measurements the Trigonon will continue to try and get a good measurement for this amount of time before it stops and you have to try again.

Config & Setup – Hover Time for Find2025-03-10T19:59:40+00:00

The Hover Time for Find (secs) setting is defaulted to 2 seconds. When performing a Hover measurement on a bucket, the Trigonon requires a short period to take multiple readings and accurately determine the bucket’s center.

  • Too short: If the hover time is too low, the device may not collect enough data, leading to inaccurate measurements.
  • Too long: If it’s set too high, you’re simply wasting time without improving accuracy.

For optimal results, keep this setting at 2 or 3 seconds.

Measuring Practice – Target Measurement2025-03-10T17:32:02+00:00

Coming Soon

Measuring Practice – AB Combined Measurement2025-03-10T17:39:51+00:00

Coming Soon

Measuring Practice – Point & Shoot2025-03-10T18:05:24+00:00

Coming Soon

Lesson 3

Project Setup – AB Line and Buckets2025-04-21T16:23:12+00:00

AB Setup

New Project – Setup AB Line & Buckets

IMPORTANT

  1. AB length should be 2/3 of the pool or at least 15ft
  2. If you are standing at the AB line and looking at the pool, A is on your Left, B is on your Right
  3. The AB line should NOT be closer than 3ft from anything you are measuring
  4. The AB line should NOT cross anything you are measuring.
Project Setup – Chalking The Pool2025-03-10T20:13:27+00:00

You’ll chalk the pool just as you would with traditional AB measuring. As you become more experienced with the Trigonon device, you’ll find that not every point needs chalking. However, until you’ve mastered the process, it’s best to chalk every point you plan to measure to ensure accuracy and consistency.

AB Measuring a Swimming Pool with Chalk

AB measuring is a precise method used to determine a pool’s shape and dimensions for tasks like installing a liner or cover. This process involves marking reference points around the pool’s perimeter with chalk, using two fixed points—A and B—as a baseline for measurement. These points are typically placed about two-thirds the length of the pool apart on the deck.

Key Aspects of AB Measuring with Chalk:

🔹 A and B Reference Points

  • Placed on the pool deck a few feet from the edge.
  • Serve as fixed reference points for all perimeter measurements.

🔹 Marking with Chalk

  • Chalk is used to mark points along the pool’s perimeter.
  • Points are numbered sequentially from the “A” point.

🔹 Measuring Distances

  • Each chalked point’s distance is measured from both A and B.
  • This data is used to map the exact shape of the pool.

Why is AB Measuring Important?

Ensures a Perfect Fit

  • Precise measurements result in an accurately sized liner or cover, eliminating gaps or misalignment.

Captures Pool Contours

  • The recorded measurements provide a detailed map of the pool, including curves, slopes, and irregularities.

By following this method, you can ensure accurate and reliable measurements, making the installation process smoother and more efficient.

Measuring Items – Pool Outline2025-04-21T13:57:12+00:00
Measuring Items – Cover Anchors2025-03-10T18:25:42+00:00

Coming Soon

Measuring Items – Features / Reverse Measurements2025-04-21T13:58:42+00:00
Measuring Items – Cross Measurements2025-05-02T20:42:04+00:00

How To Get Cross Measurements

Your Trigonon Device eliminates human error mistakes, by automatically measuring and storing each measurement.  So, once you are used to using your device and see how accurate your projects are… you may feel you don’t need to do Cross Measurements anymore.

However, there are two great reasons to still do Cross Measurements:

  1. It’s still a great way to help verify the accuracy of the measurements you’ve taken
  2. Manufacturers still prefer or require them before manufacturing a cover or liner for you

So, we would still recommend doing them.  Here’s some pointers on how to go about it with our device.

Understand how the lasers are measuring

Once you understand how the lasers work, it’s much easier to do measurements and also to troubleshoot.  Review these pointers and it will make this step go quickly and easily.

Types of lasers used

There are TWO different lasers in our Trigonon Device:

  1. Red Measuring Laser – This is the laser that actually does the measuring.  In bright sunlight, it may be difficult, or even impossible to see… especially at longer distances.  The laser can still do the measuring, but it is difficult to place it in the proper place if you cannot locate it.
  2. Green Targeting Laser – This laser helps locate the position you plan to measure.  We use a very bright green laser to target where the device is pointing.  Since you can see it on sunny days, you can point this where you need a measurement and then you know where the red, measuring laser is also going to be.

How distance effects the lasers

Our lasers are set up to be in sync with each other so that you can find the point you need to hit with the green laser and then the red laser is in the same location, automatically measuring that specific spot.

However, as the distance increases, the lasers will have a tiny bit of space between them.  From about 40 feet and longer, the red laser may be a little higher or a little lower than the green laser.

You can easily see where your red measuring laser is, in relation to your green targeting laser by practicing indoors, where you can see the red laser clearly.  Then, you can see if the red laser ends up being a little higher or lower than the green at longer distances.

Then you can easily adjust, when you are at a pool, doing a Cross Measurement.

For instance, if you realize that at 40 feet, your red laser ends up being about a 1/2″ lower than the green, then you will know how to adjust later when you do this measurement.  For instance, when you do your cross measurement, you can be sure to point the green laser high enough on the pool wall to ensure that the red laser is also hitting the wall and not the water.  If it hit the water, it would end up making an error or using the water as a measurement, which will come up shorter than it actually should be.

Here’s a picture to help understand:

image showing how the Trigonon Device lasers work to help do Cross Measurements on swimming pools


Once you understand how the lasers are used and also how distance effects them, it’s a very simple adjustment.  In the picture above, if you know that your red laser is a little underneath your green laser, then when do your Cross Measurement, you will just make sure to lift the green laser maybe a little higher than you normally would have, to ensure the red laser is hitting the pool wall.  Maybe you even just aim the green laser at the bottom of the coping or close to it.  But, it’s very simple once you understand how they work together.

Remember to hold the Device still

For your AB measurements on the pool outline, you hit the round buckets and our device does a “hover” measurement.  This is where the device takes multiple measurements and figures out the middle of the bucket for you.

However, the Cross Measurements are a different type of measurement.  This is from one point to another point on the pool, so it is what we call a “point & shoot” measurement.  You take one precise measurement from one point of the pool you measured, to the pool wall at another point you have already measured.

When doing this measurement, the last beep is the one that actually takes the measurement.  So, you have a couple seconds to make sure you have it in the correct spot.

Tips on how to hold the device to keep it steady

If you do the following, we have found it really helps to keep the device steady:

  1. Extend the walking stick higher so that it comes up to your chest, so you can “hug” the device to your chest to keep it steady
  2. Have a wide stance with your feet, so you are stable
  3. While you are holding it, you can still have your phone right there to hit the button, to start the measurement.

Here’s a picture to help explain the point:

image of a man using the pool measuring device to measure Cross Measurements in a Swimming Pool and how best to hold it

We hope these pointers help you to get quick and easy Cross Measurements!

Measuring Items – Cover Straps2025-03-10T18:29:23+00:00

Coming Soon

Measuring Items – Liner In Pool Steps & Benches2025-03-10T18:29:30+00:00

Coming Soon

Measuring Items – Liner D Measurements2025-04-21T13:56:18+00:00
Measuring Items – CD Measurements2025-03-10T18:30:53+00:00

Coming Soon

Lesson 4

Finalize & Send – Email2025-03-10T18:34:50+00:00

Coming Soon

Go to Top